Farm, Farm Tip

Willow Water

Willows are naturally high in rooting hormones.  They are one of the easiest plants to grow from cuttings.  Just take a cutting of some of the new growth and put it right in the ground or in a little water.  You will be amazed at how fast they will put down roots.

You won’t want to throw out that water.  You can use it to promote root growth on transplants as well.  It will help those plants get a good start going.

If you don’t want to root any willow cuttings you can just make willow water.  Take come cuttings of a willow or pick up a few dropped branches and cut them into pieces of a couple inches long.  Soak the pieces in water for 24 or 48 hours.  Then strain them out of the water.  Apply that water right to the transplants with your next watering.

Farm, Project

Raising the Garden Bar

Spring has finally sprung here at Furry Feathers Farms.  It is time to get going on spring planting and spring projects.  The late snow storms and cold weather adds the feeling of being behind.  So let’s get started.

We have decided to start using raised beds in the garden this summer.  You get lots of benefits from raised beds.  They allow for better drainage.  You get to choose the soil mix. When you need to add amendments to the soil, there is less place you will have to work. Among many other benefits.

We have very heavy soil.  It is a very dark, heavy clay.  While there is probably a lot of fertility in the soil, it also makes plants trying to root have a hard time getting started.  We have had some good success when we have added to the soil to loosen it up.  So that is why we are going with all raised beds.

Using our Raised Bed Estimator tool, we figured out that we need about 12 beds.  The next step was figuring out how to build and fill the beds.  Some of the materials that can be used for the sides of the beds are treated lumber, cedar, pine, rocks, or metal.  There is some concern if the treated lumber is 100% save to use and if the lumber will leach into the soil and into your food.  Cedar boards are naturally rot resistant, but like treated lumber is an expensive option.  Making the sides out of same sheet metal that is used for pole barns is slightly more affordable and durable.

We decided to go with pine boards.  These boards are going to rot.  There is no getting around that.  The question is how long will they last.  I am guessing that we will get five years out of them, with the outside chance of getting more.  The cost and the expected lifespan makes it the right choice for us.
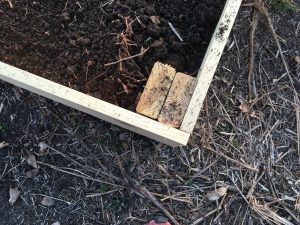
The beds are made of 1×10 pine boards with doubled up 2x4s in the corners.  The beds measure 4’x8′.   You don’t want to go any larger than 4ft.  This will allow us to reach across the beds and get to the middle from either side.  This method gets the beds up quickly.

The next step is how to fill the beds.  My brothers deposited all the leaves from their yards last fall at Furry Feathers Farm.  Leaves are a great source of compost, but the leaves themselves can also be a good source of fertility.  We are filling the beds with a generous layer of leaves at the bottom of the beds.  That is topped with a mix of our existing soil with a little peat moss to loosen the soil and some compost.  If you don’t have your own compost check with your local dump.  If they take leaves and grass clippings they will likely have a compost pile.  The local dump here the compost is free to take as long as you load it yourself.  Since it is composted I would not be concerned with any chemicals that people use on their lawn, but if you are it probably isn’t the best source for you.
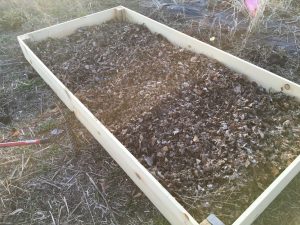
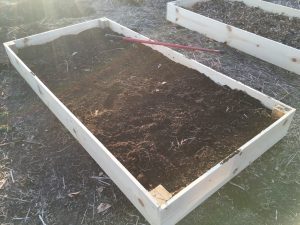
At this point, the only thing left is to get planting.  Let us know about your experience using raised beds in the comments.  We would love to hear about them.  
Farm

Raised Bed Estimator

We are going to try a new gardening method this summer.  We have very heavy clay soil and it makes gardening a challenge.  It is simpler to fill the raised beds with the type of soil you want then trying amend a large garden plot among other benefits.  The question I was having was how many raised beds do I need?

I could find a lot of information on the spacing of plants in raised beds.   I found information on how many square feet per plant was needed. I could find information on the number of plants per person to plant.  What I couldn’t find was a place that combined all the information in one place.  So I put together a tool that does.

The simplest way to use the tool is to change the number of people in your family down in the bottom left.  The tools will spit out the number of 4’x8′ raised beds you will need to build.  The tool also allows you to make customizations.

The next two fields to the right of the number of people are for the size of the raised beds you would like to build.  You can enter the width and length of your beds.  Once those are changed it will automatically adjust the number of raised beds you will need.

If your family has certain vegetables you really like and some that you really don’t care for you can adjust the number of plants per person to plant.  These changes will also all change the number of raised beds automatically.  When planting in a raised bed you can generally be more aggressive with the spacings on your plants.  The numbers on the tool are taking that into account.  You could also adjust those if you would like.  The spacing is done in inches.

I hope this tool is useful to you.  If you would like to add a different vegetable to the tool, please let me know and I will get it added.  You can just leave it down in the comments down below.  I would also like to know any feedback or results you have when using the tool.  Once again please leave them down in the comments below.

Get the tool here.

Farm

Planning 2017: Plant Propagation

I have been experimenting with plant propagation for the last two growing seasons.  I would like to be able to propagate the plants I will need to establish all everything around the farm.  I hope that I might get enough extra plants to start a small nursery service.  This summer the plan is to take a big leap forward in making new plants.

I have a small propagation rig.  It is setup using an intermittent mist system.  I have a controller that allows me to mist the plants for a few seconds every ten minutes during the day.  This propagation bed is perfect for the wood plants that I would start from cuttings.  I will put a link to the propagation timer at the end of the post.

Aronia berry and mulberry plants will be some of the top things I will be putting in the bed this year.  The mulberries are super easy to propagate and the aronia are supposed to be as well.  I highly recommend the book  American Horticultural Society Plant Propagation.  It is an amazing source of knowledge and will give you instructions to propagation nearly every plant under the sun.

Last spring I planted 10 rootstocks each of pear and apple.  I attempted a few bud grafts off the apple tree we lost in a windstorm.  This spring we will see if those grafts took.  I would really like to increase my nursery of rootstock this year.  It will be nice to be able to propagate any trees we get on the farm the preform well in our environment.  It is also a much cheaper way to get a large orchard going and sustaining.

There are few plants that I don’t currently have on the farm that I would love to get established so I can propagate them.  Hardy kiwi, blueberry, raspberry, rosa rugosa, goji berry, and cranberry to name a few.  I feel that it is important to put plants in landscaping that give a return back the owner.  If you can put a plant in like Aronia, that will give you great flowers in the spring and lovely foliage in the fall and an edible yield, isn’t that better than a plant that just gives you something to look at?

This is the last post in the series that will cover things that I know I will be doing this next year.  The next posts will covering the things I have been dreaming about.  Things that would be new and exciting.  I can hardly wait.

Farm

Planning 2017: Managing the Flocks

We have two separate flocks on the farm.  We have 6 laying hens and 10 ducks.  We have had both flocks for two years this coming spring.  We have added new ducks to the flock from hatching our own eggs.  The chicks are now past their priming laying and we will have to make some decisions.

We have both Buff Orpingtons and Australorps.  I really like both of the breeds and would like to keep them both around.  They have produced really well and seem to handle the cold very well.  I order the birds from a hatchery and had them delivered to my local feed store.  I will probably end up doing that again.  The only issue with that is having to brood the chicks.

We culled all of the roosters the first year.  We didn’t care for the noise of the roosters.  In hindsight, I wish I would have kept one around.  At least as a trial to see if he would have been loud by himself.  I had the chickens brood three broods of ducklings this spring.  This was so much easier than brooding them me.

I have thought about bringing in a rooster from another farm.  There is a sale this spring where I know I could get a mature rooster.  So we will have to decide what we would like to do.

The duck flock will be easier to manage.  We will cull out all but one or two drakes.  Then we can decide when and if we want to hatch more ducklings.  The other thing with ducks is they will stay productive for more years than a chicken.  We have a flock of Khaki Campbells that we originally bought from Metzer Farms.  I found the process of mail ordering birds to be pretty stressful.  This stress was all due to the post office and the shipping process.  Metzer’s was great to work with and would use them again for sure if we end up ordering ducks.

We have thought about adding guinea hen to the farm.  We have a pretty bad problem with ticks and they should help keep that under control.  We are a little concerned with the reputation of guineas of being loud and their pension to roam.  If the problems with the ticks get under our skin enough maybe will we take the plunge?

We have found the flocks to be enjoyable and really love the fresh eggs.  I think it is safe to say that we will continue to have them as part of the farm for the foreseeable future.

Farm

Planning 2017: The Garden

The 2016 version of the garden was too ambitious.  Some good results in 2015 made me overconfident and I over reached.  I knew that I wasn’t working with the best soil.  There were things that worked against me, the weather and the poor soil, but it was compounded by too much to do and too little time to do it.

I started all of my plants for seed early in the spring.  I had them under a grow light and on a seed mat. The seed mats are like heating pads that sit on under the seed starting containers.  It warms the soil which helps with germination. I had good luck with these and will do this again.  It was the first year I had used a seed mat and was very surprised on the difference it made.  Since I saw good results I will continue to this and will probably get a few more mats to.

I will be honest I hate weeding.  I hate being out in the heat of summer bent of a garden.  This is probably the main reason I have trouble in the garden.  If you don’t keep up with it the next thing you know you have a jungle.  So I am going to try something a little different this year.  I learned this from Curtis Stone, the Urban Farmer.  If you haven’t heard of him I encourage you to check him out.  He is doing some very cool things. Here is his YouTube channel.  He uses landscaping fabric in his garden beds.  He burns holes in the fabric and plants into those holes.  I assume he rolls up the fabric at the end of the season and gets years and years out of his fabric.

The goal I had going into last season was to focus on items that can easy store without a lot of processing.  Onion, potatoes, dry beans and winter squashes.  While that was the plan the things that the family really likes to eat comes into play and the next thing I know is we have tons of things planted in the garden.  This year with the new baby I will be planting lots of things that will go into making baby food.  So I expect to plant things like beans, peas, beets, and squash pretty heavily.

I am also planning on reducing the size of the garden.  Tentatively, I am going to divide the space into thirds.  I will keep about one third in production.  This will force me to limit what goes in the ground and allow me to care of it more.  We had such a poor year in 2016 that the yield can not be less.  The second third I will put into a cover crop.  I have not decided what I will use, but I am thinking a turnip or radish along with a clover.  The last third will get sheet mulched.   The idea would be to plant the 2018 garden in the sheet mulched area and sheet mulched the 2017 production area.

Paring back the garden will allow me to reduce the time needed to keep up with the garden.  Giving me more time to work on upgrading the quality of the soil in the garden.  In the long run I hope that will allow the garden to produce higher with a smaller footprint.  Which in turn will reduce the amount of time spend for to get that production.


Farm

State of the Farm

I have been wondering about away to start this blog off.  A way to give everyone an idea about where we are at.  So I thought I would give a sort of State of the Farm address.

The last year has involved several projects on our way to a sustainable homestead.  The year started with preparations to add our first livestock. A mobile coop was build for a flock of layers.  In the spring a straight run of 10 Black Australorps and 5 Buff Orpingtons were placed in the brooder.  Right as the chickens were removed from the brooder, they were replaced with 9 Khaki Campbell ducks.

After culling the cockerels the flock ended up with 5 Black Australorps and 3 Buff Orpingtons.  Those 8 layers kept us and our family supplied with eggs for most of the late summer and fall.  Now in the heart of winters the production has slowed.  After losing two hen ducks to predators we have 3 hen ducks and 4 drakes, 3 of which are over due to be culled.

In the spring we also attempted to add to our orchard with a several fruit trees.  Unfortunately we had little luck with the trees, but we will try again and will have a better plan on the plantings.

The annual garden produced well.  We had good crops of onions, potatoes, and dry beans especially.  We tried using soil blocks and a small low tunnel greenhouse for starting seeds.  We learned a lot about using this method and will be using it again.  Also in the garden perennials for asparagus, rhubarb and strawberries we also added.  We are looking forward to crops from those plants for years to come.

As spring approaches we are making plans for the next growing season and adding more to fledgling homestead.