Farm, Update

It just goat serious.

Despite all of the advice not to get them.  Despite all the hard work it took to get ready for them.  Despite some second thoughts, we have brought some additions to the farm.  Last Thursday, we welcomed Morgana, Cookie, and her two kids.  The fun won’t stop there as Morgana is expecting and will be kidding at any time.

After just a day of being a little scared of us, they now come over to the gate anytime they see us coming out to see them.  It didn’t hurt to have handfuls of treats will us each time we went to the goat pen.  The girls can’t get enough of them and as long as they have treats the goats can’t get enough of them.  McKinely is even excited to feed the new “puppies”.

Morgana is a Nigerian Dwarf and she is very pregnant.  We are expecting her to kid in a few weeks.  The girls are very excited for new kids.  After visiting the goats one day, they disappeared.  Turns out they went in the house and were watching Youtube videos about “know when your goat is kidding”. What would we do without the internet?  Morgana is also very much the herd queen.  She is the boss and isn’t shy about getting things her way.

Cookie is a cross between Alpine and Nubian.  She has two kids at her side, one doeling, and one buckling.  We have since named them Muffin and Thor respectively.  Cookie is a sweet goat and was the first one to become comfortable with us.  Thor is still a little unsure about us but will eat out of our hands.  Muffin still likes to keep her distance, but she is slowing becoming more comfortable.

My ultimate goal is to start milking the does. We are excited about the milk, the cheese, and soap that will we get to try from our goats.  I am sure this will be an experience and I will share all of the ups and downs with you here.

We are less than a week in but it already been a lot of fun. I am sure there will be lots of work and some ups and downs, but for now, we are just enjoying the new experience.  I am so glad we took the plunge.  Here is to that continuing.

Farm, Update

Spring Has Sprung

It really did feel like it would never come. Just 3 weeks after we were digging out of 18 inches of snow, we are enjoying 80-degree weather.  Finally allowing us to make some progress outside.  It is a great feeling to finally be moving our plans forward.

Thanks to some help from my dad and mom, we were able to get the fence up on the pen for goats.  I am putting a few coats of paint on the gates and will get those hung this week.  The next step will be to build a shelter for them. Then we will be already to bring our first few goats on the farm.

We will be putting up 12 raised beds this spring for the garden.  We are taking the approach of putting them up slowly as needed.  We have three up, filled and planted.  We have our onions for Dixon Dale Farms, salad mix, and radishes planted into those beds.  We will be working on building and filling three more beds this week.  There are tomatoes, peppers, broccoli and cauliflowers started under grow lights that will be ready to be translated in a few weeks.  There are a few different berry plants that are potted up in gallon pots that we are babying a little right now.  Just bring them outside slowly to get them used to the climate.

We had to wait a little longer than we wanted, but we are finally outdoors.  We are happy to able to get out and get some stuff done while enjoying the weather.  What are your plans for the spring?  Please let us know in the comments.

Recipes

Salami Roll-ups

This is a family favorite to pack in their lunches.  I was quite surprised with the rave reviews this got the first time I put it in their lunches.  I would have never guessed that they would have liked the salami as much as they did.   Salami is not the type of food they would usually go for.  I guess sometimes you just never know.

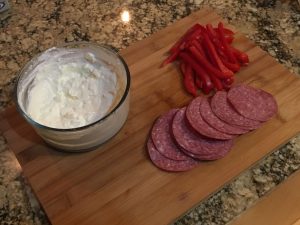
This is a pretty simple recipe with only 4 ingredients and only one technique that is a little different.  You will need cream cheese, sour cream, salami slices and a bell pepper (color of your choice).  Also get out some plastic wrap and have a cutting board handy.  There is actually one more ingredient, that is time.  We will need to leave these in the frig for a few hours.  I usually make these the night before and let them set overnight.
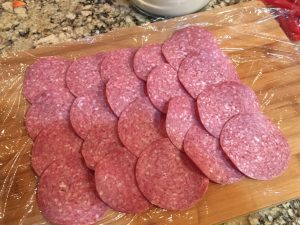
Soften the cream cheese in the microwave.  While that softens, prep your pepper by cutting in into thin strips.  Once the cream cheese is softened add the sour cream and mix until is smooth.

Lay the plastic wrap out.  Arrange the salami slices out on the plastic wrap.  They should be slightly overlapping.  Now carefully spread the cream cheese mixture evenly on the salami.  Place the pepper strips down the middle of the salami.
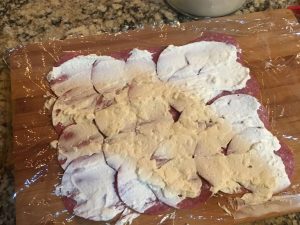
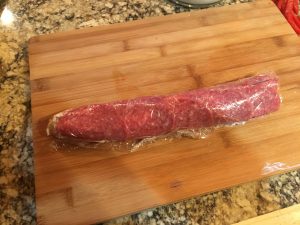
This is where the magic happens.  Take one side of plastic wrap that is closed to you and fold half of the salami over itself.  Now take the edge away from you and fold the other direction.  Taking the same edge and pull it towards yourself.  Place the edge of ta cutting board on top of the plastic wrap right at the edge of the salami roll.  While putting slight pressure downwards on the cutting board while pulling the plastic wrap towards you.  This will tighten up the salami wrap.

Finish up by wrapping the plastic wrap tightly around the roll and stash in the frig for a couple hours or overnight.  After it is chilled fetch it from your frig and cut into 1-inch rounds.  I will serve them will rice crackers.


Salami Roll-ups

The is a great little recipe that is a hit packed in school lunches or served as finger food at a party.

Ingredients

  • 4 oz cream cheese softened
  • 1/2 cup sour cream
  • 1 bell pepper cut into strips
  • 16 slices salami

Instructions

  1. Mix the cream cheese and sour cream until smooth

  2. Lay a piece of plastic wrap out and arrange the salami slices in an overlaying pattern on the plastic wrap.

  3. Spread the cream cheese mixture evenly on the salami.

  4. Lay the pepper slices down the middle of the salami.

  5. Take the plastic wrap closest to you and folder half of the salami over itself.  Then take the other side the lay the other half over.

  6. Using the plastic wrap and a cutting board tighten up the salami rolls 

  7. Wrap tightly in the plastic wrap and chill in the frig for a couple hours or overnight.

  8. Take out of the frig and cut into one-inch rounds.

Farm, Farm Tip

Willow Water

Willows are naturally high in rooting hormones.  They are one of the easiest plants to grow from cuttings.  Just take a cutting of some of the new growth and put it right in the ground or in a little water.  You will be amazed at how fast they will put down roots.

You won’t want to throw out that water.  You can use it to promote root growth on transplants as well.  It will help those plants get a good start going.

If you don’t want to root any willow cuttings you can just make willow water.  Take come cuttings of a willow or pick up a few dropped branches and cut them into pieces of a couple inches long.  Soak the pieces in water for 24 or 48 hours.  Then strain them out of the water.  Apply that water right to the transplants with your next watering.

EO-Tip, Essential Oil

Love the Sun

The return of warm weather means spending more time outside.  If you are anything like me early in the spring you don’t give much thought to being out in the sun all day.  I will get going on a project or two and the next thing I know I have spent all day outside.  The sun can pack a lot of punch even in early April and May.

If you do the same thing you make want something to support the health of your skin.  That is when I reach for the Lavender essential oil.  Just take a couple drops and apply directly to any area of concern you have.  You will be amazed by the results.


Farm, Project

Raising the Garden Bar

Spring has finally sprung here at Furry Feathers Farms.  It is time to get going on spring planting and spring projects.  The late snow storms and cold weather adds the feeling of being behind.  So let’s get started.

We have decided to start using raised beds in the garden this summer.  You get lots of benefits from raised beds.  They allow for better drainage.  You get to choose the soil mix. When you need to add amendments to the soil, there is less place you will have to work. Among many other benefits.

We have very heavy soil.  It is a very dark, heavy clay.  While there is probably a lot of fertility in the soil, it also makes plants trying to root have a hard time getting started.  We have had some good success when we have added to the soil to loosen it up.  So that is why we are going with all raised beds.

Using our Raised Bed Estimator tool, we figured out that we need about 12 beds.  The next step was figuring out how to build and fill the beds.  Some of the materials that can be used for the sides of the beds are treated lumber, cedar, pine, rocks, or metal.  There is some concern if the treated lumber is 100% save to use and if the lumber will leach into the soil and into your food.  Cedar boards are naturally rot resistant, but like treated lumber is an expensive option.  Making the sides out of same sheet metal that is used for pole barns is slightly more affordable and durable.

We decided to go with pine boards.  These boards are going to rot.  There is no getting around that.  The question is how long will they last.  I am guessing that we will get five years out of them, with the outside chance of getting more.  The cost and the expected lifespan makes it the right choice for us.

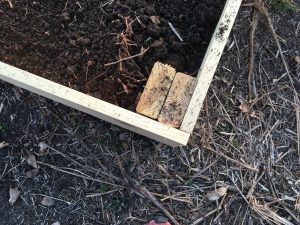
The beds are made of 1×10 pine boards with doubled up 2x4s in the corners.  The beds measure 4’x8′.   You don’t want to go any larger than 4ft.  This will allow us to reach across the beds and get to the middle from either side.  This method gets the beds up quickly.
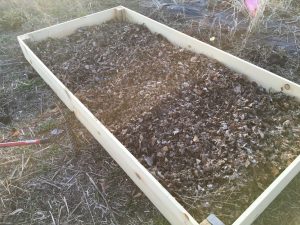
The next step is how to fill the beds.  My brothers deposited all the leaves from their yards last fall at Furry Feathers Farm.  Leaves are a great source of compost, but the leaves themselves can also be a good source of fertility.  We are filling the beds with a generous layer of leaves at the bottom of the beds.  That is topped with a mix of our existing soil with a little peat moss to loosen the soil and some compost.  If you don’t have your own compost check with your local dump.  If they take leaves and grass clippings they will likely have a compost pile.  The local dump here the compost is free to take as long as you load it yourself.  Since it is composted I would not be concerned with any chemicals that people use on their lawn, but if you are it probably isn’t the best source for you.
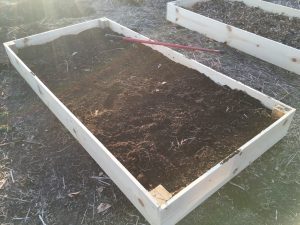
At this point, the only thing left is to get planting.  Let us know about your experience using raised beds in the comments.  We would love to hear about them.  

EO-Tip, Essential Oil

Portable Peppermint Tea

Peppermint is probably one of my favorite oils.  I use it all the time for many different reasons.  Many people know about all the benefits and reasons for drinking peppermint tea.  Well, there is about the equivalent of 27 cups of tea in one drop of Peppermint essential oil.  That made me think of the old commercials for Total cereal.

I like to keep a bottle of peppermint with me all the time.  You never know when you will need it.  Plus it sure beats carrying around all those cups of tea.

Farm

Raised Bed Estimator

We are going to try a new gardening method this summer.  We have very heavy clay soil and it makes gardening a challenge.  It is simpler to fill the raised beds with the type of soil you want then trying amend a large garden plot among other benefits.  The question I was having was how many raised beds do I need?

I could find a lot of information on the spacing of plants in raised beds.   I found information on how many square feet per plant was needed. I could find information on the number of plants per person to plant.  What I couldn’t find was a place that combined all the information in one place.  So I put together a tool that does.

The simplest way to use the tool is to change the number of people in your family down in the bottom left.  The tools will spit out the number of 4’x8′ raised beds you will need to build.  The tool also allows you to make customizations.

The next two fields to the right of the number of people are for the size of the raised beds you would like to build.  You can enter the width and length of your beds.  Once those are changed it will automatically adjust the number of raised beds you will need.

If your family has certain vegetables you really like and some that you really don’t care for you can adjust the number of plants per person to plant.  These changes will also all change the number of raised beds automatically.  When planting in a raised bed you can generally be more aggressive with the spacings on your plants.  The numbers on the tool are taking that into account.  You could also adjust those if you would like.  The spacing is done in inches.

I hope this tool is useful to you.  If you would like to add a different vegetable to the tool, please let me know and I will get it added.  You can just leave it down in the comments down below.  I would also like to know any feedback or results you have when using the tool.  Once again please leave them down in the comments below.

Get the tool here.

Featured, Recipes

Cloud Bread

This is a great recipe for a great gluten-free bread.  It only has three ingredients and a few easy steps.  It produces a light and fluffy bread that works great for sandwiches.  My family really likes the recipe.  The results are amazing, it would be amazing even if it was a much more complicated recipe.  Since it is so simple the results are almost unbelievable.

Cloud Bread

This is a quick grain free bread that produces a light fluffy bread that will remind you of a croissant.

Servings 6

Ingredients

  • 3 Eggs seperated
  • 3 tbsp Cream Cheese
  • 1/4 tsp Baking Soda

Instructions

  1. Preheat your oven to 350 degrees.

  2. Add the baking soda to the eggs whites.  Whip the egg whites to stiff peaks.

  3. In a mixer bowl combine the egg yolks and the cream cheese.  Beat them together until they are completely mixed.

  4. Fold the egg yolk mixture into the egg whites.  Just until they start to come together.

  5. On an oiled baking sheet place a spoon full of the batter.  Using the back of the spoon flatten the batter and shape it.  This will be a little like making pancakes.  Hint: The batter will puff up a little while cooking, but it won't spread out or shink.  Make them the desired size.

  6. Bake for 15-20 minutes or until they are golden brown.  Remove to a cooling rack and a allow them to cool completely before putting them in a storage container and placing them in the frig to finish cooling.